
No Bake Cheesecake with Homemade Cherry Topping
Indulge in the exquisite world of dessert perfection with an enchanting culinary creation: the no-bake cheesecake adorned with a luscious homemade cherry topping.
If the thought of savoring a velvety, airy cheesecake accompanied by the sweet and tangy burst of fresh cherries tantalizes your taste buds, then you’re in for a treat. This uncomplicated recipe unveils the secrets to crafting a sublime dessert that’s both elegant and effortless.
Get ready to embark on a culinary journey that marries creamy decadence with vibrant fruitiness. Let’s delve into the art of crafting this delightful no-bake cheesecake masterpiece.
How to Make No-Bake Cheesecake with Homemade Cherry Topping
Step 1: Crafting the Crust
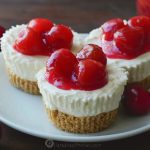
The foundation of any remarkable cheesecake begins with a well-crafted crust. Start by preparing the base. You can employ the convenience of a high-powered blender to transform graham crackers into fine crumbs.
Alternatively, opt for a more personal touch by hand-crushing the crackers until they achieve a satisfyingly delicate consistency. This method ensures you have complete control over the texture, setting the stage for a truly unique dessert experience.
Step 2: Binding the Elements
After achieving the ideal crumb texture, unite these delectable fragments with a harmonious blend of melted butter and sugar.
The marriage of these ingredients produces a cohesive mixture that binds your crust together. The beauty of this recipe lies in the simplicity—no pre-baking required.
The butter acts as an enchanting adhesive, securing the crumbs in place without the need for additional steps.
A dash of creativity comes into play when selecting how to present your cheesecakes: individual cupcake liners or charming ramekins. This choice adds a touch of personal flair to your culinary masterpiece.
Step 3: Crafting the Creamy Filling
Prepare yourself for the pièce de résistance: the luxurious cream cheese filling. Two blocks of softened cream cheese, enriched with a delicate hint of sugar, blend into a harmonious symphony of flavor.
A dash of freshly squeezed lemon juice emerges as the secret weapon, deftly balancing the sweetness while introducing a burst of citrusy brightness.
Quality is paramount; opt for fresh-squeezed lemon juice, adding authenticity to your creation.
The infusion of sour cream elevates the filling to ethereal heights. It’s crucial to achieve a super creamy and fluffy texture through careful blending, ensuring no clumps mar your masterpiece.
Step 4: Whipped Cream Elegance
Enter the realm of cloud-like indulgence with the whipped cream component. A testament to patience and precision, whipping heavy cream to stiff peaks transforms it into a light, billowy companion for the cream cheese mixture.
Gentle folding techniques preserve the cream’s volume, culminating in a decadent, rich filling. This is where the magic happens—where indulgence takes flight.
Step 5: Assembling the Masterpiece
Portioning is an art, and the trigger-release ice cream scoop emerges as your trusty tool. Uniformity is key, ensuring every bite offers an exquisite balance of flavors and textures. With the filling artfully nestled within the crust, a simple press with the back of a spoon ensures each creation is a visual delight.
The rule of no-bake bliss: maintain the richness by avoiding low-fat substitutes, enabling your masterpiece to set to perfection.
Step 6: Time to Set and Garnish
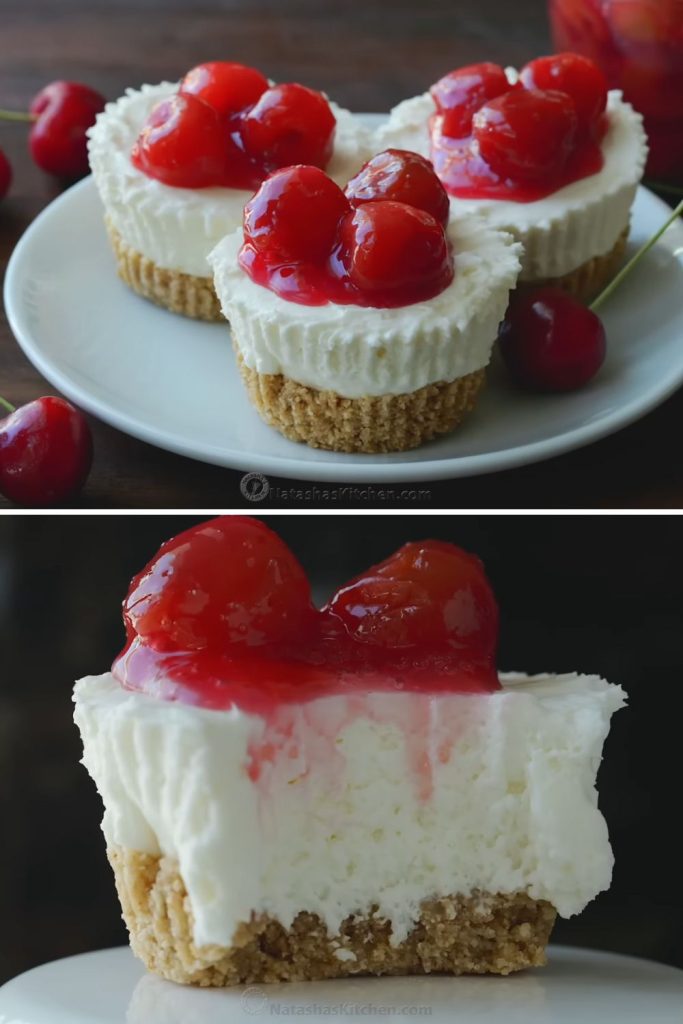
Allow your creations to embark on their journey to perfection by refrigerating them for approximately six hours. This waiting period ensures every bite is imbued with the essence of your culinary prowess. When the time is right, a homemade cherry topping emerges as the crowning glory.
A symphony of flavors unfolds as the cherries blend with a delightful concoction of cornstarch, lemon juice, and sugar.
The result? A sauce that elevates your cheesecakes to celestial heights. The artful drizzle of this crimson elixir completes the visual presentation, promising a feast for both the eyes and the palate.

Tips and Variations
- Fruitful Possibilities: While cherries grace this recipe with elegance, don’t hesitate to explore other fruit variations. Consider strawberries, blueberries, or even a medley of seasonal fruits for an ever-changing culinary canvas.
- Nutty Ventures: Elevate the crust’s texture and flavor by introducing crushed nuts. Almonds, walnuts, or pecans infuse a delightful crunch, enhancing your cheesecake experience.
- Chocolate Temptation: For a decadent twist, incorporate chocolate into the crust. A hint of cocoa powder or finely chopped chocolate can transform your dessert into a chocoholic’s delight.
Frequently Asked Questions
Q1: Can I use store-bought graham cracker crumbs instead of making them from scratch? A1: Absolutely, store-bought graham cracker crumbs can be a convenient alternative. However, crafting your own crumbs adds a personal touch and allows you to control the texture to suit your preference.
Q2: Is there a suitable substitute for sour cream in the filling? A2: Greek yogurt can serve as a substitute for sour cream, imparting a tangy creaminess to the filling. However, keep in mind that it might slightly alter the flavor profile.
Q3: How long does the cherry topping take to cool before adding it to the cheesecakes? A3: Ideally, allow the cherry topping to cool to room temperature before adding it to your cheesecakes. You can expedite this process by refrigerating the sauce, ensuring it doesn’t compromise the cheesecake’s texture.
Kitchen Tools/Equipment Needed:
- High-powered blender or food processor
- Measuring cups and spoons
- Mixing bowls
- Electric mixer or eggbeater attachments
- Trigger-release ice cream scoop
- Cupcake liners or ramekins
- Medium saucepan
- Whisk
No-Bake Cheesecake with Homemade Cherry Topping
- Total Time: 6 hours and 45 minutes (including chilling time)
Description
A divine no-bake cheesecake with a velvety cream cheese filling, perched atop a buttery graham cracker crust, crowned with a homemade cherry topping.
Ingredients
- For the Crust:
- 1 and 1/2 cups graham cracker crumbs (approximately 10–12 graham crackers)
- 1/4 cup granulated sugar
- 1/3 cup melted unsalted butter
- For the Filling:
- 2 blocks (16 oz) cream cheese, softened
- 1 cup granulated sugar
- 1 tablespoon freshly squeezed lemon juice
- 1 cup sour cream
- For the Whipped Cream:
- 1 cup heavy whipping cream
- For the Cherry Topping:
- 2 cups fresh cherries, pitted and halved
- 1/4 cup cold water
- 2 tablespoons cornstarch
- 1/4 cup granulated sugar
- 1 tablespoon freshly squeezed lemon juice
Instructions
- Prepare the Crust:
- Crush graham crackers into fine crumbs using a blender or by hand.
- Combine graham cracker crumbs, sugar, and melted butter in a bowl. Mix until moistened.
- Divide the mixture into cupcake liners or ramekins. Press the mixture firmly to create the crust base.
- Create the Creamy Filling:
- In a large mixing bowl, beat softened cream cheese and sugar until creamy and fluffy.
- Add freshly squeezed lemon juice and sour cream. Beat until well combined and smooth.
- Whip the Cream:
- In a separate bowl, whip heavy whipping cream until stiff peaks form.
- Assemble the Cheesecakes:
- Gently fold the whipped cream into the cream cheese mixture until fully incorporated.
- Portion the mixture into cupcake liners or ramekins. Flatten the tops with a spoon.
- Refrigerate and Garnish:
- Refrigerate the cheesecakes for approximately 6 hours or until set.
- Prepare the cherry topping by cooking cherries with water, cornstarch, lemon juice, and sugar until thickened. Let it cool to room temperature.
- Drizzle the cherry topping over the cheesecakes before serving.
Notes
Calculating Nutritional Information: (Nutritional values are approximate and may vary based on specific ingredients used)
- Prep Time: 30 minutes
- Cook Time: 15 minutes (for cherry topping)
- Category: Dessert
- Method: No-bake
- Cuisine: Fusion
Nutrition
- Serving Size: 14 mini cheesecakes
- Calories: 300
- Sugar: 20g
- Sodium: 200mg
- Fat: 20g
- Saturated Fat: 20g
- Unsaturated Fat: 6g
- Carbohydrates: 27g
- Fiber: 1g
- Protein: 3g
- Cholesterol: 60mg